So, one day, while visiting the Old Julian Photography Gallery. I saw another photographer’s pictures had been done in what they call HDRI or HDR. At first, I was not a big fan of it, because I really hate to alter my photographs, but I’d say after awhile it kinda grew on me. So, I decided to try my hand at HDR photography. What is HDR Photography? Here is the answer from a San Diego photographer:
HDRI stands for High-dynamic-range imaging. According to Wikipedia, HDR can be explained as:
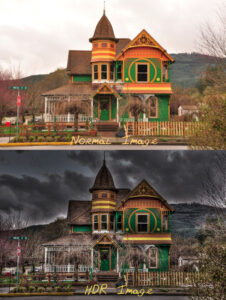
High-dynamic-range imaging (HDRI or HDR) is a set of methods used in imaging and photography to capture a greater dynamic range between the lightest and darkest areas of an image than current standard digital imaging methods or photographic methods. HDR images can represent more accurately the range of intensity levels found in real scenes, from direct sunlight to faint starlight, and is often captured by way of a plurality of differently exposed pictures of the same subject matter
Basically, in a nut shell is a series of pictures taken at various exposures and then combined together to form one dynamic picture. The reason, I say dynamic is because; it tends to make standard pictures look bland or plain, if you will. Because of the various exposures involved, you tend to get a great range of both light and shadows. An HDR picture tends to pop compared to normal pictures. HDR is actually not that difficult to shoot and with a little practice, you can be making great images. Here are some things you will need:
A DSLR camera capable of taking HDR pictures.
A shutter release for your camera. (**Note: It can be tethered or radio controlled. **)
A tripod. (**Note: Because you will need to take multiple exposures, the camera needs to remain absolutely still. **)
An interesting subject to express your creativity.
Here are some steps to capture HDR pictures. Mount your camera on the tripod and connect the shutter release cable. Set your camera to multi-shot mode, either slow or fast. You may wish to set your camera to shoot in Aperture mode only, so go ahead and make those adjustments. Go into your cameras Custom Setting Menu and select Bracketing/flash. Go into Auto Bracketing set and set to AE only for Nikons. Next you will need to adjust the number of shots. This is done, by holding down the BKT button and moving the rear dial. I recommend using 5 shots, so the display should read 5F. Next you will need to adjust the exposure increments. Once again hold the BKT button down, but this time move the front dial. I recommend using 1.0, so your display should now read 5F 1.0. (**Note: You will need to make the appropriate Aperture, ISO, and White Balance settings yourself. **) And that is it, you’re done!I spoke with one photographer on the subject and he changes the exposure manually, while on a tripod.
Next blog I will show you how to create HDR pictures, by cheating. I hope I have not bored you too much. I had fun writing this one. I trust I have given you some valuable tips to think about, before planning your next shoot. It’s not all bad, just be clear and informative, it will save you a lot of headaches. Remember nothing is set in stone and there is not perfect formula, so go out and have some fun.
Leave a Reply